EXPORTING AND UPLOADING
For this project, there are THREE files you must upload to the Assignment Inbox on the shared workspaces.
#1 - the QuickTime Movie. This is your actual movie. Your final, edited video footage.
- Open your completed project (if you have mutliple projects or timelines open, close all but your final version to reduce the opportunity for mistakes)
- Set an "IN" point at the very beginning of your work and an "OUT" point at the very end.
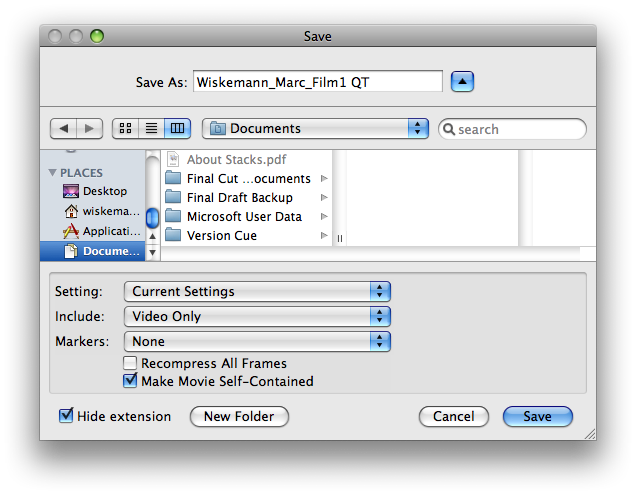
- Go to File > Export > QuickTime Movie... (NOT "Using QuickTime Conversion),
-
CHECK the "make movie self-contained" box
- Leave the settings as "Current Settings"
- CHANGE the dropdown that says "Audio and Video" to "Video Only" and export the file
- Name the file in the following format: YourLastName_FirstName - Film1 QT
- Make certain you save the file somewhere that you can find it (like on the Desktop or in your Documents folder)
AFTER IT HAS BEEN SAVED – WATCH IT!!!!!
You should watch it to make sure the entire clip is there.
You should watch it to make sure you actually saved the video from the correct project.
You should watch it to make sure that you have picture.
You should watch it to make sure you’re not missing any shots that you thought were in there
You should watch it because it is what will determine your grade and if you upload a flawed project, your grade will reflect that fact.
After you've watched it completely, THEN log onto the Media Workspaces and copy/upload this file into your Assignment Inbox.
#2 - Your FCP Project file. This is the file that contains your timeline. It has all the information about what parts of what clips you’ve used in what parts of your project.
The “project file” is a small file. It does NOT contain any of the actual media. In other words, it doesn’t contain any of the actual video footage or audio clips in it. The project file has all of the vital information about what you’ve done with the video footage and sound clips.
Where can your project file be found?
Your project files can be found by clicking on the “UserSpace” drive, then finding your personal folder (named the same as your email address), then click on “documents”. The project file will be named whatever you named your project.
Your project file is a .fcp file and has an icon that looks like this: ![]()
Your project file’s icon does NOT look like this: ![]() nor does it look like this:
nor does it look like this: ![]() or this:
or this: ![]() That is what your video and/or audio files might look like.
That is what your video and/or audio files might look like.
Make SURE that you are selecting the correct file and you are uploading your final, completed version.
NOTE: You should ALL make periodic backup copies of your projects as you work on them in this class. The easiest way is for you to email them to yourself as an attachment. But you can also upload them to your own “student space” or save them on a jump/thumb drive or whatever. The files are very small and you can do this every time you finish working for the day.
If you do NOT make backups of your project file and something happens to your computer or the file gets deleted or becomes corrupted, then ALL of your work will be gone. If you DO have a backup, then all you have to do is to put the raw footage back on the computer and all of you work will be restored.
------> MAKE BACKUPS!
Additionally, you might want to regularly save updated versions under new names. Go to File > Save As and save the project under a new name that you can identify.. For example: Film1Day01, Film1Day02, and so on. Make sure it’s something you will not get confused.
- So, when you’re completely done with your editing, you need to upload the PROJECT file into the Assignment Inbox folder on the Shared Workspace (prior to the beginning of class on the due-day or it will be late)
#3 - The XML file.
You will create the XML export by doing the following:
-1- Make sure you've saved your completed project and it is open in Final Cut Pro
-2- Click on the grey background of the "Browser window" so there is no single (or multiple) clip or sequence selected.
If you don’t do this, FCP will try to export an XML file for just the specific clip you’ve highlighted and not your entire project. You need to do this so no file or files are selected.
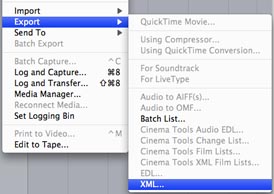
-3- Go to File -> Export and select “XML…”
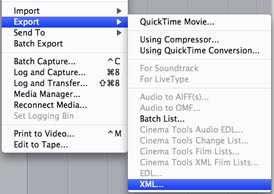
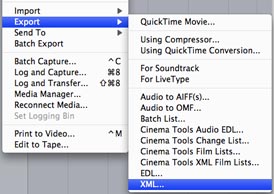
NOTE: Nothing else in the export window should be selectable except for “Batch List…”. If you have the option of selecting “Quicktime Movie” or anything like that, then you have not de-selected everything n the "Browser window". Go back to step 2 and make sure that nothing is selected in that window.
It should look like this:
It should NOT look like either of these:
-4- You will now see a window open that is labeled “Export XML…” at the top. There is a dropdown menu for “format” You must change it so it says “Apple XML Interchange Format, version 3”. Do NOT use any other version.
-5- There is an “Options” checkbox for “Include master Clips Outside Selection”. This option should be greyed out. If it is not greyed out and you have the ability to check or un-check that box, then you need to hit cancel and go back to step 2.
-6- Name your file: YourLastName_FirstName - XML Film1 and save it somewhere that you can find it.
-7- Drag and drop the XML file into your Assignment Inbox along side the Project File and QT Movie.
07 – Exporting and Uploading |